January 14, 2026
LED retrofits are a smart way to upgrade your lighting without replacing entire fixtures. They save energy, reduce maintenance, and improve lighting quality. Here’s what you need to know to get started:
Switching to LEDs can cut lighting energy use by up to 80%, with ROI often under 9 months. Whether you choose TLEDs, retrofit kits, or new luminaires, proper planning ensures better performance and savings.

LED Retrofit Options Comparison: Installation Time, Cost, and Energy Savings
When it comes to upgrading to LED lighting, there are three main retrofit options, each catering to different budgets and project requirements.
Lamp-only replacement is the simplest and quickest method. This involves swapping out fluorescent tubes for tubular LEDs (TLEDs) while keeping the original fixture housing. There are three UL-classified types to consider:
If your ballasts are over five years old, Type A might not be the best choice, as the ballast could fail before the LED lamp, leading to additional replacement costs.
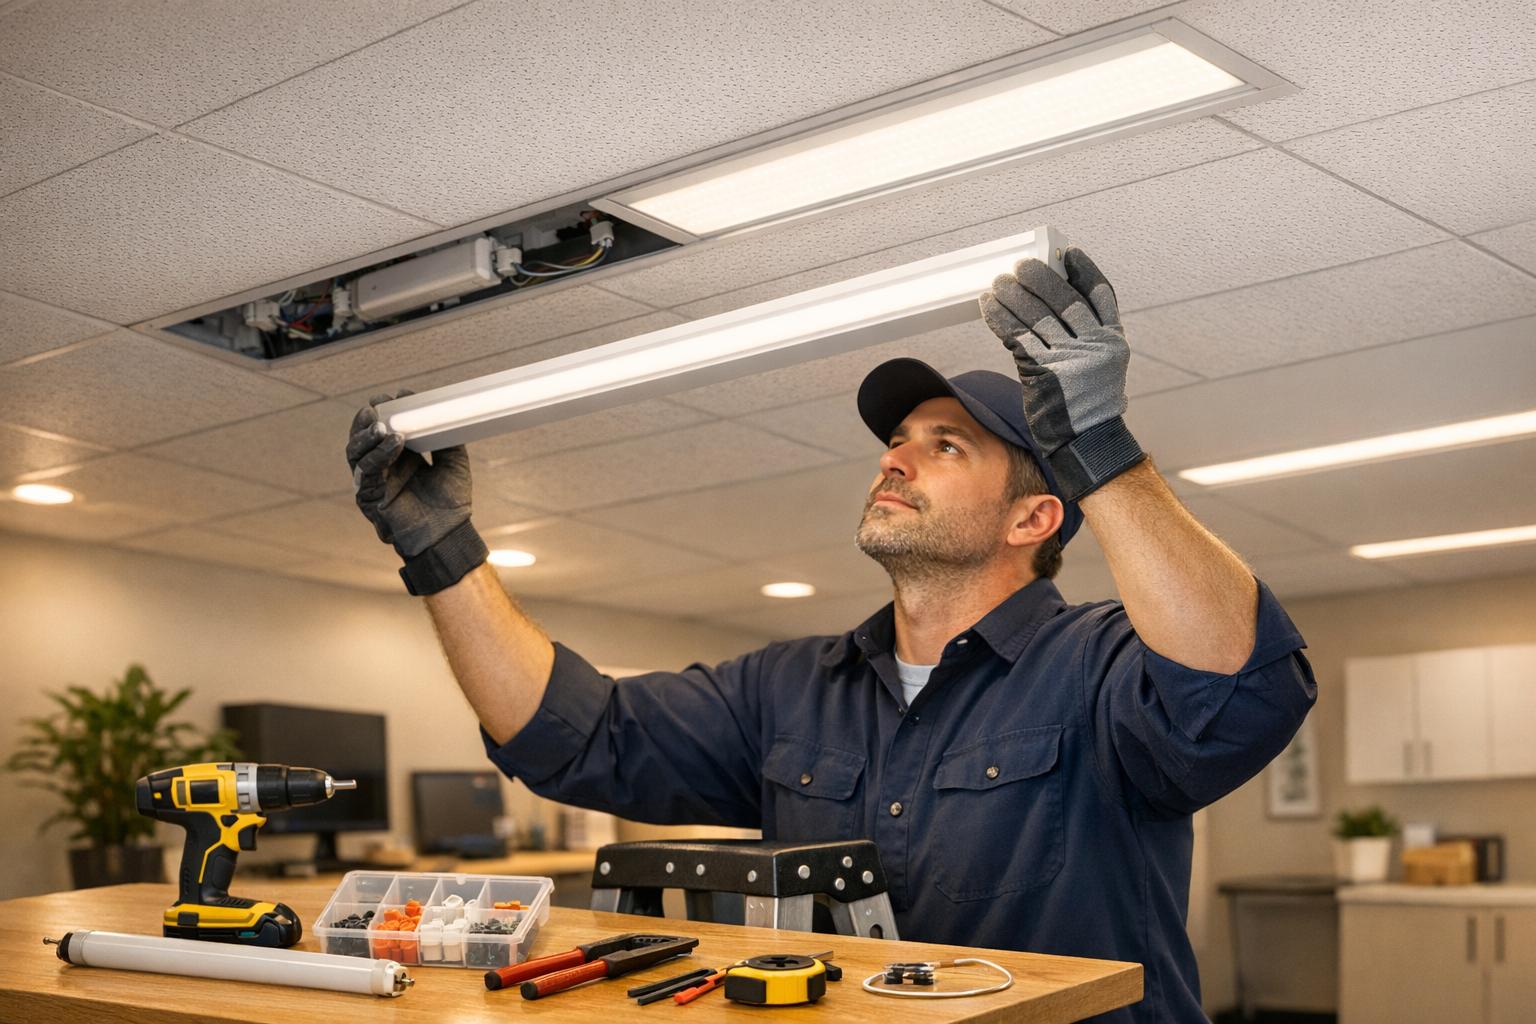
LED retrofit kits take it a step further by replacing all internal components - lamps, ballasts, sockets, and optics - while keeping the fixture housing intact. These kits can be installed in under 15 minutes per fixture and typically deliver energy savings of 50%–70% when the fixture housing is in good condition.
Complete luminaire replacement involves removing the entire old fixture and installing a brand-new LED-integrated unit. While this approach has a higher upfront cost and takes over 30 minutes per fixture to install, it provides the highest efficiency and compatibility with advanced features like occupancy sensors and daylight harvesting. This option is ideal for fixtures that are damaged, discolored, or when a full aesthetic upgrade is desired.
"The key to a successful lighting upgrade is to assess your existing facility needs, evaluate the available upgrade options, and testing a few fixtures before committing." - Energy Performance Lighting
Each of these retrofit methods offers unique advantages, from energy efficiency to reduced maintenance needs.
Switching to LED retrofits delivers substantial energy savings thanks to their higher efficacy and lower wattage requirements. LEDs typically produce 120 to 130 lumens per watt, with some models reaching as high as 180 lumens per watt. In comparison, fluorescent and metal halide systems average around 75 lumens per watt. For example, replacing a 100-watt metal halide fixture with a 33-watt LED can provide similar light output while using significantly less energy.
Bypassing the ballast with certain retrofit options eliminates "phantom" energy consumption - a hidden inefficiency where ballasts draw power even though it doesn’t contribute to light output. Removing the ballast also reduces a common failure point, cutting down on future maintenance costs.
LEDs also outlast traditional lighting systems by a wide margin. With a typical lifespan of 50,000 hours, LEDs can provide about 19 years of use at 10 hours per day, five days a week. In contrast, fluorescents last around 20,000 hours, and metal halides average just 10,000 hours. This extended life means fewer replacements, reduced labor costs, and less need for equipment rentals to access high ceilings.
On top of these savings, the return on investment for LED retrofits is often achieved in under nine months. Utility rebates can further accelerate these benefits, making the switch even more appealing.
Taking a closer look at your current lighting setup is key to avoiding compatibility problems and choosing the right LED retrofit.
Start by visually inspecting your fixtures to figure out what types you’re working with. In commercial spaces, you’re likely to encounter fixtures like troffers (rectangular lights in ceiling grids), strip lights (long, linear channels), recessed cans, or high bays (bell-shaped or UFO-style lights designed for high ceilings).
Look for manufacturer labels that list wattage and model numbers - these details are crucial for finding compatible LEDs. You can also remove a lamp and check the etched part number, such as "F32T8", which tells you the lamp type and size (T8 lamps are about 1 inch in diameter, while T12 lamps are roughly 1.5 inches).
Pay attention to the socket type, whether it’s shunted or non-shunted, as this will affect LED tube compatibility. Additionally, check for signs of aging like discolored lenses or outdated ballasts. If these components are past their prime, you might need to consider full retrofit kits or even new luminaires.
"If your ballasts are older than 5 years, consider UL Type B or C replacement lamps, retrofit kits, or new luminaires instead." – Energy.gov
This step lays the groundwork for evaluating the performance of your current lighting system.
Once you’ve identified your fixtures, it’s time to measure how well they’re performing. Use a light meter to measure illuminance levels - offices typically require 30–50 foot-candles (fc), while corridors need at least 5 fc. These measurements will help ensure your LED retrofit matches or exceeds current light levels.
Next, calculate the total wattage of your system, including both the lamps and ballast. For instance, a four-lamp F32T8 fixture may consume 131 watts when factoring in the ballast. To estimate the LED wattage needed for replacements, use a 2.5:1 ratio for fluorescent lamps or a 3:1 ratio for metal halides.
Inspect for any yellowed reflectors, cracked lenses, or rust, as these can cut light output by 20–40%. For example, one project replaced 11,800 fixtures, slashing annual lighting costs from $291,000 to $53,500 and reducing energy use by 82%.
Before making a full commitment, install a sample LED fixture in your space. This test run allows you to evaluate light distribution, color quality, and potential glare, ensuring the retrofit meets your expectations.
Once you've assessed your system, it's time to refine your LED options by focusing on three main considerations: physical fit, energy efficiency, and installation complexity.
The first step is to ensure that the LED retrofit will fit your existing fixture housing. Most LED retrofits are designed to align with standard sizes like 1×4-ft, 2×4-ft, or 2×2-ft fixtures. Double-check that the retrofit matches the socket specifications of your existing fixture.
One thing to keep in mind: LEDs emit directional light. While this improves downward illumination, it can sometimes leave nearby vertical surfaces darker.
"If beam angle is much less than 180 degrees, the foot-candle level on walls or nearby vertical surfaces may be noticeably lower than with fluorescents." – Lindsay Audin, Contributing Editor, FacilitiesNet
Once you've confirmed the physical fit, the next step is to evaluate the LED's energy efficiency.
Efficacy is a key measure of how well an LED fixture converts electricity into light. This is expressed in lumens per watt (lm/W). Modern LEDs typically achieve an efficacy of 120 to 130 lm/W, a significant improvement over the 75 lm/W seen with fluorescent and metal halide fixtures. The higher the efficacy, the less energy is needed to produce the same level of brightness.
It’s worth noting that fixtures can trap 25%–35% of lumens, which reduces overall efficiency. For maximum energy savings, look for tubular LEDs (TLEDs) with an efficacy above 98 lm/W, meeting the Federal Energy Management Program's (FEMP) minimum standards for linear fluorescents. Additionally, many utility rebate programs require products to be listed on the DesignLights Consortium (DLC) qualified list, which typically sets a minimum efficacy of 110 lm/W for TLEDs.
Finally, think about how installation methods will impact long-term maintenance and performance.
For the simplest installation, UL Type A TLEDs are an excellent choice - they can typically be installed in under five minutes. However, if the fixture's ballast is more than five years old, UL Type B or C TLEDs might be a better option. These require bypassing the ballast and rewiring the fixture, which takes about 15 minutes and usually requires an electrician. While this process is more involved, it eliminates the ballast as a potential failure point.
"LED technology is not intended to use ballasts and therefore Colite Technologies strongly recommends bypassing the ballast entirely and rewiring the whole fixture." – Colite Technologies
For those looking to reduce long-term maintenance, full retrofit kits or entirely new luminaires are worth considering. Although these options have higher upfront costs and take over 30 minutes per fixture to install, they often provide better durability and performance. When choosing an LED fixture, be sure the warranty covers both the LED chips and the drivers, as drivers tend to fail before the chips themselves.
Let’s break down how to choose the right LED retrofits for the three most common fixture types in commercial buildings.
Fluorescent troffers dominate commercial spaces in the U.S.. When retrofitting these fixtures, you have three main choices: Tubular LEDs (TLEDs), retrofit kits, or full luminaire replacements.
One thing to watch out for: TLEDs often have narrower beam angles compared to the 360-degree light spread of fluorescent tubes. This can lead to the "cave effect", where work surfaces are well-lit, but walls remain dim. Before committing to a large-scale retrofit, test the lighting in a single room to ensure even distribution.
Now, let’s move on to strip lights, which share some compatibility challenges with linear fixtures.
For strip lights, retrofitting typically involves TLEDs, with the same Type A, B, or C options as troffers. Make sure the fixture lengths match and inspect the socket conditions before proceeding.
Finally, let’s address recessed can lights, where beam angles and heat management play a crucial role.
Recessed can lights need careful consideration of beam angles and heat dissipation. These fixtures are typically retrofitted with LED lamps or dedicated LED downlight kits.
Deep recessed cans with narrow beam angles can also create the "cave effect", lighting the floor but leaving walls dim. To fix this, choose LEDs with beam angles over 200 degrees or look for "dual shine" models that spread light more evenly across vertical surfaces.
To ensure compatibility, match the LED output and color temperature to your existing setup. Most commercial spaces perform well with color temperatures between 3000K and 5000K. Since recessed cans trap heat, select LEDs with good thermal management to prevent premature burnout.
Take the time to measure current light levels and conduct a lighting audit before selecting the right LED solution.
Before diving into any installation work, turn off the circuit breaker to cut power to the area. This step is critical for your safety, as working on live wiring carries a high risk of electric shock.
Take a moment to inspect the condition of your fixtures. Look for rusted housings, yellowed lenses, or cracked reflectors. If the damage is extensive, replacing just the lamp may not suffice - you might need to replace the entire fixture. In older buildings, pay special attention to potential hazards like PCBs in ballasts or asbestos in ceiling tiles.
Once that's done, remove the fluorescent tubes and open the wiring compartment to check the ballast type - whether it's magnetic or electronic. This distinction will guide your wiring process. Inspect the sockets, commonly called "tombstones", to determine if they are shunted (used with instant-start ballasts) or non-shunted (used with rapid-start ballasts). Many instant-start setups feature shunted sockets, which are incompatible with Type B TLEDs unless replaced.
Gather your tools before starting: wire cutters, four wire nuts per fixture, electrical tape, and replacement G13 sockets. Having everything ready will save time and keep the project on track.
With these preparations complete, you’re ready to move on to mounting and wiring for a safe and efficient installation.
To ensure a smooth installation, bypass the ballast and wire the line voltage directly to the sockets. This eliminates the risk of ballast failure, but it requires careful attention to detail. Use wire nuts and electrical tape to secure all connections, and make sure the wiring compartment cover is firmly reattached.
"LED technology is not intended to use ballasts and therefore Colite Technologies strongly recommends bypassing the ballast entirely and rewiring the whole fixture."
Label all modified fixtures as being wired for line voltage. This precaution helps prevent someone from mistakenly installing fluorescent lamps in the future, which could result in a shock hazard. For any rewiring work, it’s always best to hire a licensed electrician to ensure compliance with electrical codes.
For retrofit kits, securely mount the new light engine and driver within the existing fixture housing. This prevents vibration and loose connections. Replace the old fluorescent diffuser with the one provided in the kit to optimize light distribution. It’s also a good idea to test one retrofit first to check the beam spread and light quality before proceeding with the rest.
Plan installations during off-hours and organize supplies in advance to avoid disruptions. For example, in 2016, CKE Restaurants Holdings retrofitted 6,800 troffers across 204 locations. Supplies were palletized at each store beforehand to streamline the process. Juliann Rogers, Director of Energy, highlighted the importance of preparation:
"If you're rolling out a lot of restaurants, for example, one little hitch like a backorder on something means you have to hold off on that store and it throws your whole schedule off."
Take a close look at your current lamps and fixture conditions to shape your retrofit approach. Start by reviewing the types of fixtures you have and their energy consumption. Don’t overlook the potential presence of hazardous materials, like PCBs in older ballasts, which may require special handling.
When choosing new fixtures, focus on efficiency, compatibility, and ease of installation. Aim for LEDs that offer 120 to 130 lumens per watt. Opting for ballast-bypass solutions can save you from future maintenance headaches. Before diving into a full-scale upgrade, consider testing a sample installation in a single room. This allows you to confirm that the color temperature and beam spread meet your expectations, ensuring a smooth transition.
If you’re bypassing old ballasts, be sure to label all modified fixtures clearly. For safety and compliance, it’s always wise to rely on professional installation.
For larger projects, expert advice can help you avoid common issues like dimming problems, overheating, or wiring constraints. Working with knowledgeable professionals and selecting high-quality fixtures can lead to better performance and long-term savings. Texas Lighting Consultants, for instance, offers comprehensive support for commercial facilities across Texas, from initial energy audits and fixture selection to rebate assistance and professional installation. They help businesses maximize energy savings while maintaining excellent light quality.
A well-planned retrofit can cut your lighting energy use by up to 80%, providing years of reduced energy costs and improved visual comfort. It’s an investment that pays off in efficiency and ease of maintenance for the long haul.
LED retrofits come in three main types - A, B, and C - each designed to work differently with existing fixtures and ballasts:
The right choice depends on your project goals. If you’re looking for a quick and affordable solution, Type A is the way to go. For better efficiency and durability, Type B is a smart pick. And if you're ready for a complete overhaul with advanced features, Type C is your best bet. Need help deciding? The experts at Texas Lighting Consultants can guide you to the option that fits your budget and performance needs.
To figure out if your current fixtures can handle LED retrofits, start by identifying the type of fixture you have - whether it's fluorescent, metal halide, or HID. Look for a ballast, and if one is present, check its type (magnetic or electronic) by examining the label or the inside of the fixture.
Once you've identified the ballast, confirm if the LED retrofit is compatible. Ballast-compatible (Type A) LEDs work with the existing ballast, while ballast-bypass (Type B) LEDs require you to remove the ballast entirely. There are also hybrid options (Type A/B) that give you more flexibility since they can operate with or without a ballast. Additionally, double-check the fixture's dimensions and wattage rating to ensure the LED retrofit will fit and function properly.
For extra peace of mind, refer to the manufacturer's compatibility chart or try a test installation to confirm everything works as expected. If you're unsure or need expert guidance, Texas Lighting Consultants offers on-site audits to help you choose the best LED retrofit solution for your setup.
To safely and correctly install LED retrofit fixtures, keep these important precautions in mind:
By sticking to these guidelines, you can make the retrofit process both safe and effective. At Texas Lighting Consultants, we prioritize these safety practices to provide dependable, code-compliant lighting solutions for commercial, educational, and municipal projects throughout Texas.
We’re a HUB-certified Texas lighting company specializing in surveys, calculations, and installations for government and contractor projects.
© 2025-26 | Texas Lighting Consultants | All Right Reserved.