January 30, 2026
Switching to LED lighting can cut energy use by 50-60% and extend bulb lifespan to 50,000–100,000 hours, compared to traditional fluorescents. By 2035, LEDs are projected to save 569 TWh annually - the equivalent output of over 92 power plants. However, the transition isn't always simple. Common issues include flickering, dimming inconsistencies, overheating, and fixture compatibility. These problems often stem from mismatched components, outdated fixtures, or poor-quality products.
Key challenges and solutions:
The article provides practical steps to troubleshoot these issues, ensuring efficient and reliable lighting systems. For professional guidance, Texas Lighting Consultants offers tailored solutions for retrofitting and installations.
Flickering lights often point to electrical issues that need immediate attention. When a bulb isn’t securely connected, the electrical current can arc across the gap, leading to an unstable connection. This arc can reach temperatures of over 10,000°F (5,500°C), which is hot enough to ignite nearby materials. Alarmingly, faulty electrical systems are behind more than 50,000 house fires annually in the United States.
Pinpointing the cause of flickering lights makes it easier to address the problem.
The most frequent issue is loose wiring in switches, fixtures, or breaker panels. Electrician Johnny Sharif explains that flickering can stem from a loose bulb, an overloaded circuit, fluctuating voltage, or an incompatible dimmer. Another common issue is worn-out sockets, where corroded threads or flattened center tabs fail to maintain proper contact with the bulb base. Additionally, incompatible dimmer switches, especially those designed for incandescent bulbs, use phase-cutting technology that doesn’t pair well with LED drivers, leading to visible strobing. Large appliances like refrigerators or air conditioners can also cause brief voltage dips, which might result in flickering.
Fixing flickering lights can often be straightforward but sometimes requires professional help.
First, try tightening the bulb securely in its socket - this simple step resolves many flickering issues. If the bulb is already tight but the problem persists, turn off the power at the breaker and check the fixture for loose or exposed wires. Timothy Thiele, an electrician with IBEW Local #176, advises:
"If the bulb flickers on and off, it usually means that the switch contacts are getting bad. Usually, you'll be able to hear a sizzling or crackling sound if the switch contacts are bad".
Replace any switch that feels soft or emits unusual sounds. For sockets with flattened center tabs, use an insulated tool to gently bend the tab upward to reestablish contact. If flickering continues or you notice burning smells or buzzing sounds, call a licensed electrician immediately - these are signs of dangerous arcing or issues within the electrical panel. Minor repairs typically range from $150–$300, but more extensive circuit work can cost over $800.
LED bulbs can sometimes flicker, buzz, or fail to light properly at lower dimmer settings. This happens because standard dimmers were originally designed for incandescent bulbs, which dim by reducing voltage to their filament. LEDs, on the other hand, use a built-in driver to manage current. When the dimmer and the LED driver aren’t compatible, these issues arise.
Traditional dimmers require a minimum load of 25W–60W to function properly, but LED bulbs typically consume less than 10W. This mismatch often causes flickering or uneven dimming. Many older dimmers also use forward-phase (TRIAC) technology, which cuts the start of the electrical waveform. However, most LED drivers perform better with reverse-phase (ELV) dimming, which adjusts the waveform’s end for a smoother signal. Another common issue is the "pop-on" effect, where the light stays off until the dimmer is turned up past a certain point, at which it suddenly jumps to full brightness. These problems highlight the need for dimmers specifically designed for low-wattage LED loads.
Switching to LED-compatible dimmers can solve these issues. Replace older dimmers with models designed for LEDs, especially trailing-edge (ELV) dimmers that can handle loads as low as 0W–10W. Before buying, check the dimmer manufacturer’s compatibility chart to ensure your LED bulbs will work smoothly, as different LED drivers can react differently to control signals. Many LED dimmers also include a "trim" adjustment, allowing you to set the minimum brightness level and avoid flickering or dropouts at low settings.
If you're unsure about installation or electrical codes, it’s best to consult a licensed electrician for a safe and compliant setup. For those in Texas, Texas Lighting Consultants can provide expert advice and assistance with upgrading your lighting system (https://texaslightingconsultants.com).
After addressing dimming challenges, another key aspect of maximizing LED performance is ensuring compatibility with existing fixtures.
Switching from old fluorescent tubes to LEDs often isn't as simple as it seems. One major issue is ballast incompatibility, which can lead to humming, buzzing, or even dangerous arcing. Additionally, socket types can present a problem - older fixtures may have shunted or non-shunted sockets, which directly impacts the compatibility of Type B and double-ended LED tubes.
Another hurdle is light distribution. While fluorescent tubes emit light in a full 360° pattern, many LED tubes are directional, with beam angles as narrow as 105°. This can result in dark spots, uneven lighting, and even trapped heat, which can lower the efficiency and lifespan of the LEDs.
To ensure a smooth retrofit, start by checking the manufacturer's compatibility list, especially for Type A systems, as compatibility can vary widely. Inspect your existing sockets to determine whether they are shunted or non-shunted before choosing your LED tubes.
For better performance and longevity, consider upgrading to Type C systems with external drivers or magnetic LED strip kits, which improve heat dissipation. These modern LED systems can cut energy use by 50–60% and usually pay for themselves in 18 months to 3 years.
"If the Type B unit has a UL label, the UL of the fixture in which it is installed, according to the TLED's instructions, is not violated." - Tom Lichtenstein, UL Representative
If you're bypassing a ballast, make sure to attach a UL-mandated warning label to the fixture. This step is essential to avoid future installation errors. For businesses in Texas looking for large-scale lighting upgrades, Texas Lighting Consultants provides comprehensive services, including assessments, compatibility checks, and professional installations (https://texaslightingconsultants.com).
Managing heat effectively is crucial to ensuring LED lights perform well and last as long as they should. Even though LEDs operate at cooler temperatures compared to incandescent bulbs, they still produce a significant amount of heat. In high-power LEDs, up to 70% of the energy they consume can turn into heat at the junction if not properly handled. Unlike incandescent bulbs that radiate heat outward, LEDs direct heat backward toward their base and the fixture. This design makes proper thermal management essential to avoid premature failures.
The most common culprit? Poor ventilation. In enclosed fixtures with limited airflow, heat can get trapped, causing junction temperatures to rise above the recommended 86–140°F (30–60°C). This can speed up wear and tear.
Other contributing factors include overdriving LEDs, mismatched wattage, or improper installation - like bulbs placed too close together or without enough clearance. Additionally, low-quality heat sinks made from subpar materials may fail to effectively pull heat away from the LED junction.
Start by using LED bulbs specifically rated for enclosed fixtures if they’re being installed in sealed spaces. Always ensure the bulb's wattage aligns with the fixture's maximum rating to avoid overloading the system. Make sure fixtures have enough clearance and avoid placing insulation directly against them, as this can block heat from escaping.
"Thermal management is generally the single most important factor in the successful performance of an LED over its lifetime." - ENERGY STAR
Regular upkeep is also essential. Cleaning dust and debris from bulbs and fixtures can prevent buildup that might interfere with heat dissipation. Using dimmers or smart schedules to reduce full-power operation can also help lower the thermal load. As with dimming and compatibility, managing heat is key to getting the most out of your LEDs.
For businesses in Texas managing large-scale LED installations, Texas Lighting Consultants offers expert assessments and ventilation solutions to help extend the lifespan of your lighting systems. Learn more at https://texaslightingconsultants.com.
Spotting subpar components starts with checking certifications and performance ratings. For example, high-quality LEDs typically have a Color Rendering Index (CRI) of 82 or higher and carry ENERGY STAR and UL certifications. On the other hand, a CRI below 80 often signals inferior performance.
Another warning sign is the driver quality. Poor-quality drivers can cause flickering, buzzing, or humming. If you notice inconsistent light output or strange noises from a fixture, it could indicate a problem. Heat sink materials also deserve attention - cheap or insufficient materials often fail to dissipate heat properly, which can lead to early failure.
Warranty length is another clue. Reliable commercial suppliers usually back their products with five-year warranties, while consumer-grade items often include at least three years of coverage. Products with little or no warranty are often built with lower-quality components.
Once you've identified what to avoid, it's worth considering the benefits of certified products. Certified lighting components provide long-term performance and financial savings. For instance, while ENERGY STAR-qualified fixtures might cost $5 more upfront, they save about $6 in energy costs over their lifetime. To put it into perspective, the lifetime energy cost for a top-tier downlight is $22, compared to $28 for a less efficient alternative.
Certified products also boast a rated lifetime of 25,000 hours, significantly cutting down on replacements and maintenance costs. Plus, many certified fixtures qualify for utility rebates and incentives, which you can locate using tools like the ENERGY STAR Rebate Finder. Beyond cost savings, quality LEDs help reduce risks like flicker-related fatigue, headaches, and eye strain - common issues with lower-grade lighting. Investing in quality components not only prevents problems like flickering and overheating but also ensures better overall performance and reliability.

Common LED Lighting Problems: Causes, Quick Fixes, and Prevention Guide
Here’s a handy table summarizing frequent issues with energy-efficient lighting, their typical causes, quick solutions, and preventative measures. This reference pulls together the troubleshooting advice mentioned earlier.
| Problem | Primary Causes | Quick Fixes | Long-Term Prevention |
|---|---|---|---|
| Flickering or Strobing | Incompatible dimmers; loose wiring; voltage spikes from appliances | Tighten bulbs and connections; test with an incandescent bulb to pinpoint the issue | Install LED-specific dimmers; use constant-current drivers; isolate lighting circuits |
| Dimming Inconsistencies | Non-dimmable LEDs; outdated phase-cutting dimmers; insufficient electrical load | Swap the dimmer for an ELV or CL-rated model | Check compatibility lists from manufacturers; test setups before final installation |
| Dim Starts / Slow Brightening | Aging capacitors; faulty LED drivers; low-quality components | Replace the bulb or driver | Choose high-quality LED products from trusted brands |
| Overheating | Poor ventilation; enclosed fixtures; excessive current | Use open or semi-open fixtures to improve airflow | Opt for LEDs rated for enclosed spaces; incorporate heat sinks for thermal management |
| Trapped Light / Low Efficiency | Using the wrong bulb type (e.g., A-type bulbs in recessed fixtures) | Switch to reflector-type bulbs like PAR or BR types | Match bulb shape and beam direction to the fixture design |
| Uneven Brightness | Voltage drops on long runs; poor phosphor coating quality; mismatched color temperatures | Use parallel wiring for LED strips; power both ends of the run | Buy "binned" LEDs from reliable manufacturers for uniform color and brightness |
| Buzzing or Humming | Incompatibility between the LED driver and dimmer; poor product design | Replace the bulb or dimmer switch | Select well-designed components that meet FCC standards |
| Ghosting (Glow when Off) | Residual current in the circuit | Ensure proper grounding and neutral wire connections | Use LED-compatible switches and drivers of high quality |
This table can serve as a quick guide for solving common lighting issues in your space. Most problems arise from mismatched components or inferior product quality, both of which can often be avoided with thoughtful planning and careful product selection.
For customized energy-efficient lighting solutions, visit Texas Lighting Consultants.
Energy-efficient lighting can reduce operational costs by 30% to 60% in commercial spaces, but achieving these savings often requires resolving common issues. Most problems arise from mismatched components or low-quality products, both of which can be avoided with proper planning and informed decision-making.
Light quality matters just as much as light quantity. Choosing the right fixtures, dimmers, and controls ensures your lighting system performs at its best. Whether you're addressing compatibility issues with existing fixtures or preventing overheating-related failures, the solutions discussed here offer practical steps to maintain efficient and dependable lighting systems. These steps not only enhance performance but also ensure long-term operational efficiency.
Texas Lighting Consultants provides end-to-end solutions, handling everything from design to installation. They can guide you through complex decisions, such as retrofitting options, control system integration, and component selection. For customized energy-efficient lighting solutions in Texas, visit Texas Lighting Consultants.
LED light flickering typically happens because of an incompatibility between the LED bulb and the dimmer switch. To address this, make sure your dimmer switch is designed to work with LED lights. Pairing it with dimmable LED bulbs can further reduce the chances of flickering.
Another possible cause is loose wiring. Double-check the electrical connections to ensure everything is secure. If the flickering continues despite these adjustments, it might be time to consult a lighting expert who can evaluate your setup and suggest the best fix for your needs.
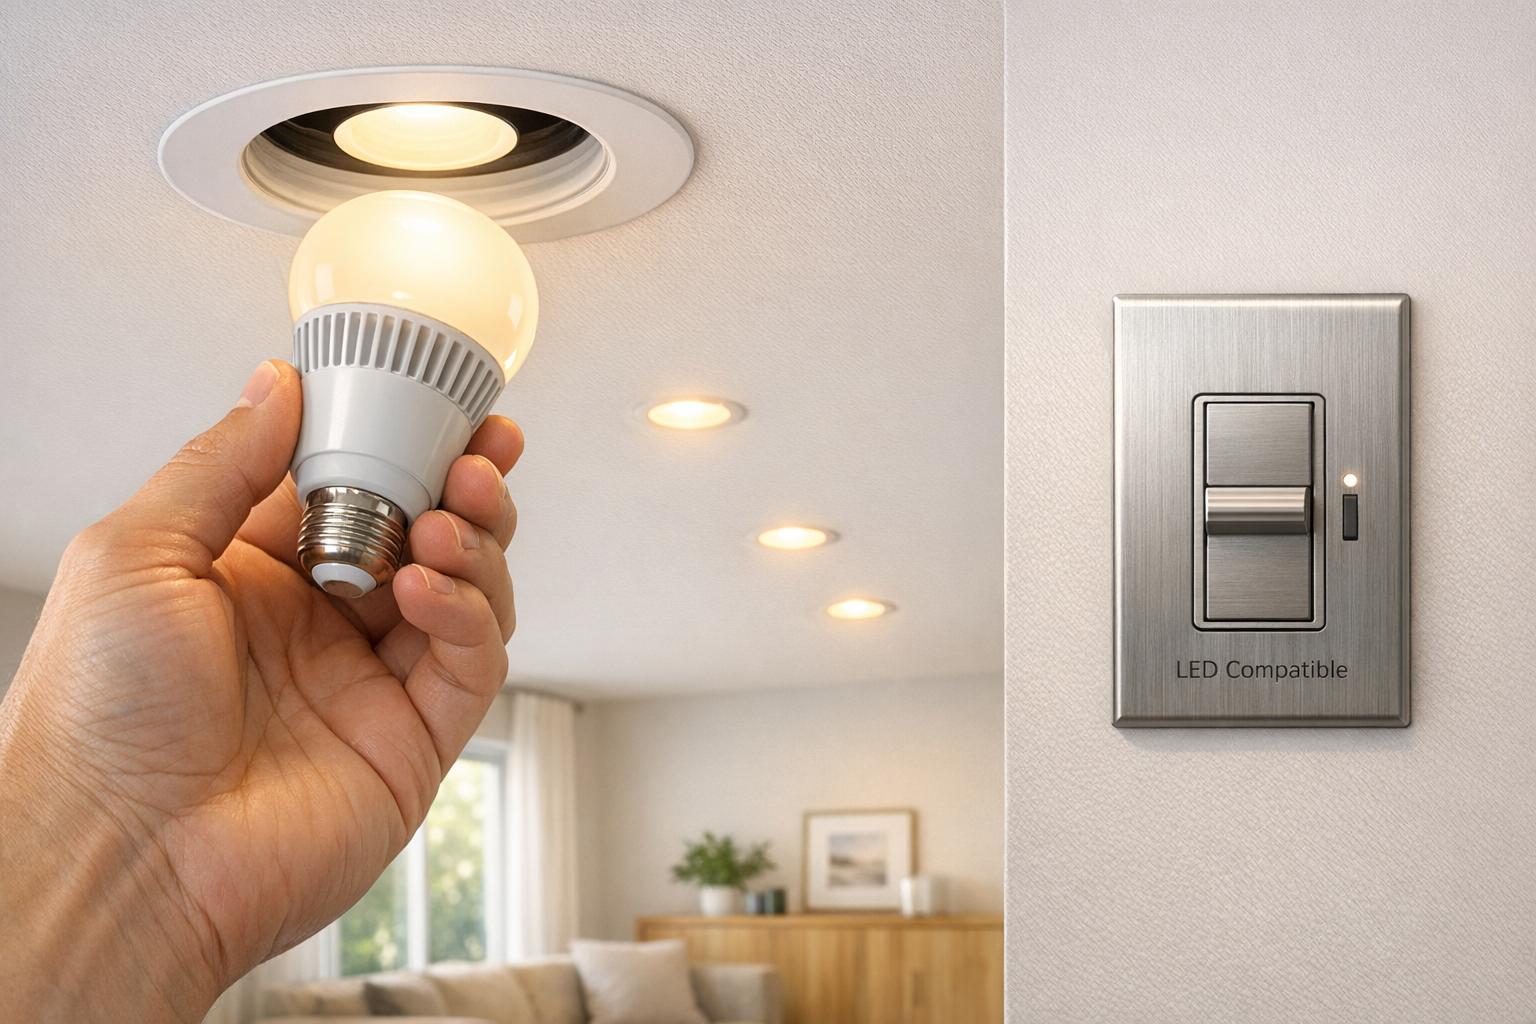
To keep your lighting system running smoothly and avoid problems like flickering or an uneven dimming range, it's important to use a dimmer that's specifically rated as LED-compatible. Make sure the dimmer aligns with the technical requirements of your LED bulbs or fixtures, such as wattage and bulb type. This ensures your lighting system remains efficient and lasts longer.
For commercial or municipal lighting upgrades, reaching out to professionals like Texas Lighting Consultants can guide you toward the best options for energy-efficient and reliable performance.
Ensuring your LED lights work well with your fixtures is key to avoiding annoying problems like flickering, buzzing, or uneven dimming. When everything is compatible, your lighting system runs more smoothly, especially if you're using existing dimmers or controls.
Choosing LEDs that fit your fixtures properly also boosts energy efficiency and helps your lighting system last longer. This means lower energy bills and fewer hassles with replacements or adjustments.

We’re a HUB-certified Texas lighting company specializing in surveys, calculations, and installations for government and contractor projects.
© 2025-26 | Texas Lighting Consultants | All Right Reserved.