January 4, 2026

Designing an LED lighting layout for commercial spaces can save energy, improve visibility, and reduce costs. Here’s what you need to know:
This guide covers everything from assessing your space and selecting fixtures to installation and maintenance tips. Proper planning can reduce fixture costs by up to 30% and ensure long-term performance. Let’s dive in.
LED Layout Design Process: 4-Step Commercial Lighting Implementation Guide
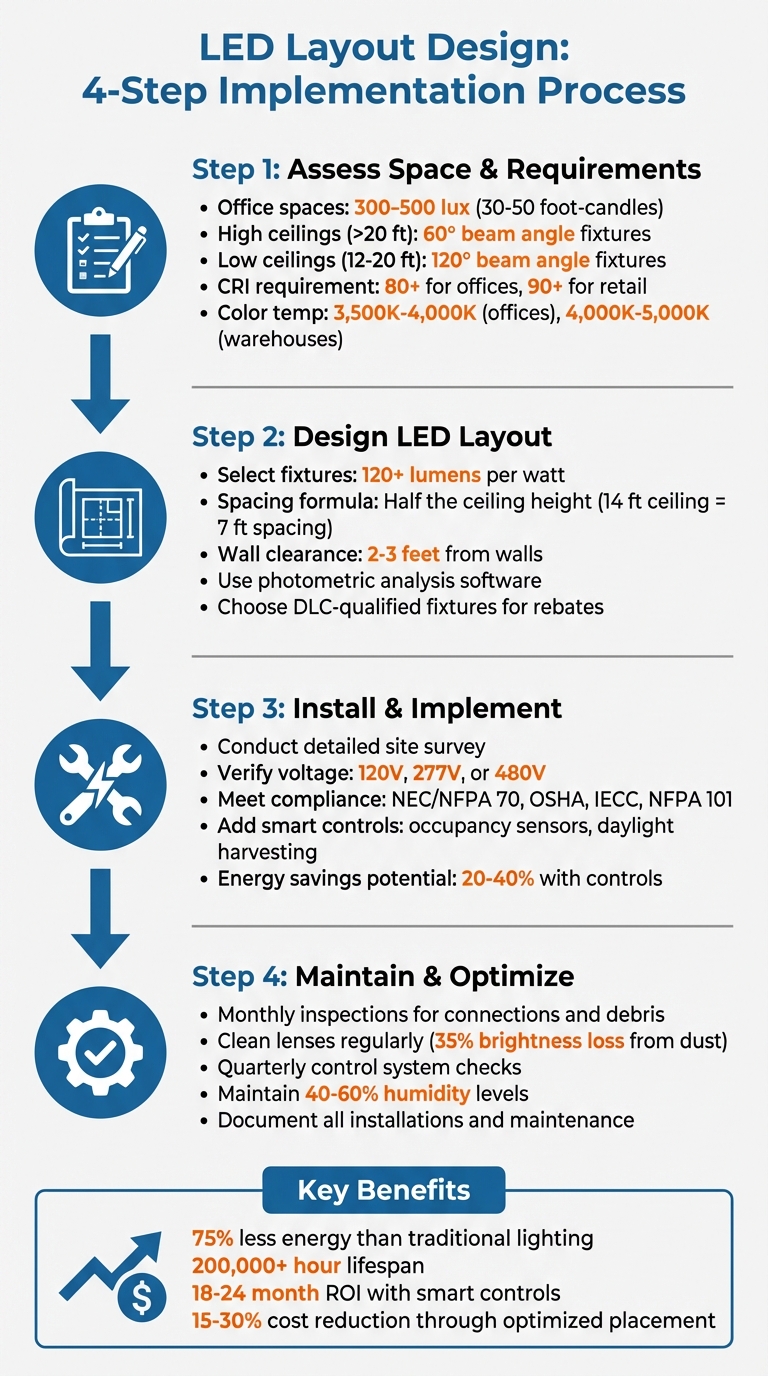
Lighting needs vary significantly depending on how a commercial space is used. For example, office environments generally require 300–500 lux to support productivity, with additional task lighting at workstations to minimize eye strain. On the other hand, retail stores need brighter lighting to highlight merchandise, while warehouses often operate with lower lighting levels, except in areas where specific tasks are performed.
Ceiling height plays a big role in determining the type of fixtures needed. Spaces with ceilings higher than 20 feet require high-bay fixtures with 60° beam angles, while ceilings between 12 and 20 feet are better suited for low-bay fixtures with 120° beams. Additionally, physical obstacles like machinery, shelving, or architectural elements can interfere with light placement, creating shadows or dark areas. Documenting these details during an initial walkthrough helps ensure proper light distribution and avoids unwanted gaps in coverage. Tailoring the lighting to the unique needs of each space ensures the right balance of brightness and functionality.
The first step in a lighting plan is determining the brightness levels required for your space. For instance, commercial offices need 30–50 foot-candles (300–500 lux) with a Color Rendering Index (CRI) of 80 or higher. In contrast, spaces like retail stores or healthcare facilities often require a higher CRI for accurate color representation. Color temperature also matters: neutral white (3,500K–4,000K) is ideal for offices to maintain focus, while cool white (4,000K–5,000K) improves visibility in warehouses and industrial areas.
Your design must also meet key regulations and standards, including OSHA workplace safety guidelines, IECC energy-efficiency requirements, and NFPA 101 emergency egress codes. To reduce upfront costs, consider using DLC-qualified fixtures, which may qualify your project for utility rebates. Once you’ve set these goals, evaluate your current lighting system to pinpoint areas for improvement.
Before designing a new LED layout, it’s crucial to assess your existing setup. Start by documenting the number and types of fixtures, lamp wattages, and ballast configurations. Use a light meter to measure foot-candles at the task level - this helps identify areas that are too dim, overly bright, or unevenly lit. Billy Ramirez, Branch Manager at FSG Albuquerque, stresses the importance of detailed audits:
"The most important part of conducting a lighting audit is writing down the exact number of fixtures, the right lamp and wattage types in every fixture, as well as the 'burn hours' for each light, and not just the business's hours of operation".
Accurately calculating burn hours - factoring in all operational periods - provides reliable data for ROI projections. Reviewing at least a year’s worth of electricity bills establishes a baseline for operating costs. It’s also essential to inspect your electrical infrastructure to ensure it can handle new LED drivers and control systems. Lastly, gather feedback from employees about issues like glare, hot spots, or poorly lit areas. This input helps address existing challenges and guides the design of a more effective lighting system.
When choosing LED fixtures, focus on lumen output, not wattage. Look for LEDs that deliver at least 120 lumens per watt. Also, consider the color temperature and CRI (Color Rendering Index) to match the lighting needs of your space. For instance, offices typically benefit from neutral white light around 4,000K and a CRI of 80 or higher. In contrast, retail spaces often require 3,000K–3,500K with a CRI of 90+ to ensure accurate color representation.
As ProLighting highlights:
"Choosing the correct beam angle is key to performance. A 60° beam is perfect for high ceilings, while 120° works best in lower bays for even coverage".
Beam angles should align with ceiling height. For ceilings over 25 feet, narrower optics (around 60°) minimize light spill, while lower ceilings work better with wider angles (approximately 120°). In moisture-prone areas, opt for IP65-rated fixtures, and for outdoor or heavy-duty industrial environments, go with IP67-rated fixtures. Additionally, selecting DLC-qualified fixtures can make you eligible for utility rebates, helping to offset upfront costs.
Once you’ve chosen the right fixtures, the next step is to plan their placement for even light distribution. Proper positioning eliminates dark spots and reduces glare. Use the lumen method: multiply the room’s square footage by the required lumens per square foot (offices generally need 50–75, while retail spaces require 30–50). Divide the total lumens needed by the output of each fixture to determine how many units are required.
For spacing, follow a spacing-to-height ratio: place fixtures at half the ceiling height. For example, with a 14-foot ceiling, fixtures should be spaced roughly 7 feet apart. Keep fixtures 2–3 feet away from walls to avoid harsh shadows and ensure even lighting along the perimeter.
RC Lighting puts it well:
"A lighting layout is a blend of aesthetics, intuition, and calculation, forming the basis of excellent lighting design".
Before finalizing your layout, inspect the ceiling for potential obstructions like HVAC ducts, pipes, or beams that could interfere with light distribution. Using photometric analysis software can help simulate light dispersion, identifying any hot spots or dim areas and ensuring balanced illumination across the space.
Incorporating controls and sensors can reduce operating costs by 20–40%. For example, occupancy sensors automatically turn lights on or off based on movement, while vacancy sensors require manual activation but often achieve even greater energy savings. Schools using occupancy sensors, for instance, report an average energy cost reduction of 24%.
Daylight harvesting systems are another smart addition. These systems adjust LED brightness based on natural light levels, making them ideal for spaces near windows or skylights. Pair this with high-end trim settings that cap brightness at 80% - this not only extends the lifespan of fixtures but also reduces heat output. In multipurpose areas like conference rooms, task-specific scenes can be programmed to dim general lighting while maintaining focused illumination where needed.
Choose sensor technology based on the space’s characteristics. For enclosed areas, PIR (passive infrared) sensors work well, while ultrasonic sensors are better suited for open spaces. Dual-tech sensors combine these technologies to minimize false triggers. With modern energy codes increasingly requiring features like automatic shutoff and daylight-responsive controls, these systems are vital for compliance. When calibrating sensors, start by setting lights to full brightness, then fine-tune the sensor’s response to match the room’s conditions for optimal performance.
With these elements in place, you’re ready to move on to installation and system adjustments.
Once the design strategy is finalized, the next step is careful installation and thorough testing. Start with a detailed site survey to document ceiling heights, room dimensions, electrical infrastructure, and any architectural obstacles. Use a voltage tester to determine whether the system operates on 120V, 277V, or 480V, and confirm that the junction boxes have adequate capacity. Photometric analysis can help verify proper fixture spacing.
Early collaboration with MEP (Mechanical, Electrical, and Plumbing) teams and structural engineers is essential. This step helps avoid mounting issues and reveals any hidden structural challenges. Select mounting hardware - whether surface, recessed, or pendant - based on the specific substrate, and ensure compliance with local seismic regulations. Make sure all fixtures are UL/ETL certified and DLC-qualified, as many rebate programs require pre-approval before equipment purchases. Check local utility requirements to avoid any setbacks. Proper coordination at this stage ensures code compliance and a smooth installation process.
In Texas, most commercial lighting projects require permits from local authorities before installation begins. Post-installation inspections are also necessary to ensure compliance with the Texas Building Code. All work must adhere to the National Electrical Code (NEC/NFPA 70) and NFPA 70E, which cover workplace safety measures like proper grounding, circuit design, and overcurrent protection. Fixtures should be certified by approved testing agencies and rated for their specific environments, such as "wet location" for exposed outdoor areas or "damp location" for covered spaces like eaves.
For underground wiring, the depth requirements are 18 inches for PVC conduit and 6 inches for rigid metal conduit. Before digging, call 811 at least three days in advance to have underground lines marked. In Dark Sky communities, installations must use fully shielded fixtures with U0 BUG ratings (no uplight) and color temperatures of 3,000K or lower to minimize light pollution. Non-compliance in areas like West Texas can result in fines, starting at $200 for individuals and $1,500 for businesses.
Once installation and compliance checks are complete, rigorous testing ensures the system performs as expected. Confirm LED fixture voltages: standard setups should measure 10–15V, while low-voltage setups should fall between 10.5–11.5V. Use light meters to measure foot-candles or lux at task surfaces, ensuring these match the targets outlined in the photometric plan. Check the uniformity ratio (average-to-minimum foot-candles) to confirm balanced lighting without hotspots or dark areas.
Test sensors and dimming schedules to ensure they operate correctly. For emergency lighting, verify the required 90-minute runtime by turning off the circuit breaker, rather than relying solely on the test button. This method replicates an actual power outage. As ProLighting advises:
"Always test emergency fixtures with the breaker off - not just the test button. That's how inspectors will do it".
After furnishing the space, adjust sensor positions to account for furniture and partitions that may block coverage or cause malfunctions. Inspect lenses for dirt or degradation, and fine-tune fixture positioning or beam angles to minimize glare and improve light distribution. Create a digital maintenance map to label fixture locations and schedule cleaning intervals, streamlining future upkeep.
Dust and debris can dim LED brightness and reduce contrast by as much as 35%. To keep your LEDs performing their best, clean lenses with a soft, lint-free cloth or a non-abrasive brush paired with pH-neutral cleaners. Stay away from harsh chemicals like bleach, which can damage protective coatings. Monthly inspections are key - look for loose connections, frayed cables, or discolored components. Tightening connections regularly can help prevent flickering and extend the lifespan of your system.
Managing heat is another critical factor. Overheating is a leading cause of premature LED failure. Ensure proper ventilation and maintain clear airflow around fixtures, particularly in enclosed spaces. Keep ambient humidity between 40% and 60% to avoid moisture-related corrosion and static buildup. For outdoor fixtures, inspect weatherproof seals (IP65-rated) annually, and watch for signs like cloudy lenses, rust, or flickering, which could indicate water intrusion. Once airflow and moisture levels are under control, test system controls to confirm energy efficiency.
Check dimmers, motion sensors, and timers every quarter, and update smart systems through manufacturer portals to keep them running smoothly. To extend the life of fixtures in low-use areas, consider using motion sensors or timers to minimize frequent on/off cycling.
Routine maintenance is great, but upgrading your system can take its performance to the next level. When adding new fixtures or integrating advanced controls, buy extra units from the same production batch to ensure consistent color and brightness across the system. Before installation, use photometric studies to map out the expanded layout, which helps avoid costly changes mid-project. For a less invasive setup, consider wireless systems like Bluetooth Mesh or ZigBee. These eliminate the need for additional control wiring, cutting down on labor and ceiling disruptions.
When expanding, make sure LED fixtures operate within a voltage range of 10 to 15 volts. Group fixtures into zones to keep voltage drops below 1 volt per group. If you're retrofitting, look into kits that allow you to reuse existing fixture housings. This avoids opening ceiling plenums, which could contain hazardous materials. For even greater reliability, bypass old fluorescent ballasts with UL Type B or C TLEDs to reduce flickering and eliminate ballast-related failures.
Good documentation is the backbone of effective LED system management. Keep detailed digital records of installation dates, model numbers, lumen outputs, and invoices. These records can be invaluable for warranty claims and utility rebate applications. Before making firmware updates, back up your control settings to avoid losing key configurations.
Create a maintenance map that includes circuit IDs and cleaning schedules. This simplifies long-term facility management and ensures your system stays efficient over time. Proper documentation doesn’t just make future upkeep easier - it also solidifies the long-term benefits of your LED system, ensuring it continues to deliver peak performance for years to come.
Designing an effective LED layout starts with understanding your space - factors like ceiling height, room dimensions, and how the area is used. A well-thought-out layered lighting approach, combining ambient, task, and accent lighting, ensures a balanced environment that promotes safety, enhances productivity, and improves visual comfort. Using photometric modeling tools such as DIALux or AGi32 helps avoid expensive mistakes before installation begins. Adding smart controls, like occupancy sensors and daylight harvesting systems, can cut energy use by 60–80% compared to older systems. These systems often pay for themselves within 18–24 months. Regular upkeep, such as cleaning lenses, checking electrical connections, and keeping system documentation up to date, ensures your lighting setup performs optimally over time. With these principles in mind, you can achieve a high-performing and efficient lighting design.
Texas Lighting Consultants specializes in providing full-service expertise for commercial LED projects across Texas. As a HUB-certified, woman-owned business, they handle every aspect - from initial site evaluations and photometric analysis to selecting fixtures, ensuring code compliance, and overseeing installation. Their advanced simulations deliver precise foot-candle readings and ideal light distribution patterns before any work begins. They also help clients identify utility rebates and ensure all fixtures meet DLC standards, which can lower fixture costs by 15–30% through optimized placement. Whether you're upgrading a 5,000-square-foot office or a large, multi-zone warehouse, their precise designs and end-to-end project management eliminate guesswork and deliver measurable results.
Kick off your project by conducting a site survey to assess ceiling heights, electrical setups, and any potential obstructions. Then, connect with Texas Lighting Consultants at https://texaslightingconsultants.com for a consultation. They can create a custom photometric plan tailored to your needs - usually within 1–2 days for standard projects and 5–10 days for more complex facilities. Start planning today to see how a well-designed LED layout can lower your energy bills, improve visual comfort, and align with your long-term sustainability goals.
Layered lighting brings a range of benefits to commercial spaces. By blending ambient, task, and accent lighting, it creates a harmonious environment that balances practical needs with visual appeal. This approach not only boosts visual comfort and minimizes eye strain but also helps cultivate a more productive and inviting atmosphere for everyone in the space.
Another advantage of layered lighting is its flexibility. It allows spaces to effortlessly shift between different purposes or moods. Whether it’s showcasing architectural details or providing focused lighting for specific tasks, this method ensures your space remains functional while looking polished and professional.
Photometric analysis examines how light spreads throughout a space, ensuring the LED layout achieves the necessary brightness, uniformity, and safety standards. With a photometric plan in hand, designers can figure out the best fixture placement, tweak mounting heights, and choose the right optics. This helps prevent over-lighting, saves energy, and cuts operating costs.
The process also highlights issues like dark spots or overly bright areas. Designers can then adjust fixture spacing or add supplemental lighting to ensure balanced illumination. Software tools like DIALux and AGi32 simulate how the lighting will perform in real-world conditions, factoring in things like light depreciation over time. This makes it easier to refine fixture placement and count, resulting in a lighting design that’s both efficient and cost-effective.
For commercial projects in Texas, Texas Lighting Consultants leverages photometric analysis to create tailored LED layouts. Their approach enhances energy efficiency, meets performance objectives, and ensures spaces are visually comfortable for occupants.
When choosing LED fixtures, the height of your ceiling is a crucial factor. It influences the type of fixture, how it’s mounted, and how light is distributed to achieve the best results.
For low ceilings (8–10 ft), go for fixtures with wide beam angles (120°–150°). This helps spread light evenly and minimizes glare. Recessed downlights or surface-mounted fixtures with lower lumen outputs (around 1,000–2,500 lumens) are perfect for spaces like offices, classrooms, or retail environments.
For mid-range ceilings (10–20 ft), LED panels, linear troffers, or pendant-mounted fixtures are great options. At these heights, narrower beam angles (60°–90°) work effectively, and lumen outputs in the range of 2,500–5,000 lumens provide ample light while remaining energy efficient.
For high ceilings (over 20 ft) - think warehouses or gymnasiums - high-bay or low-bay luminaires are the way to go. These fixtures are designed to deliver higher lumen outputs (10,000–20,000 lumens) and use specialized optics to direct light downward. Proper spacing and mounting are essential at these heights to avoid dark spots and ensure consistent lighting.
No matter the ceiling height, it’s important to also factor in beam spread, color rendering (CRI), color temperature (CCT), and energy efficiency to meet the specific needs of your space. Texas Lighting Consultants can assist in creating a custom LED lighting plan that ensures optimal performance and compliance with local regulations.
We’re a HUB-certified Texas lighting company specializing in surveys, calculations, and installations for government and contractor projects.
© 2025-26 | Texas Lighting Consultants | All Right Reserved.